Pages

Wednesday, March 9, 2011

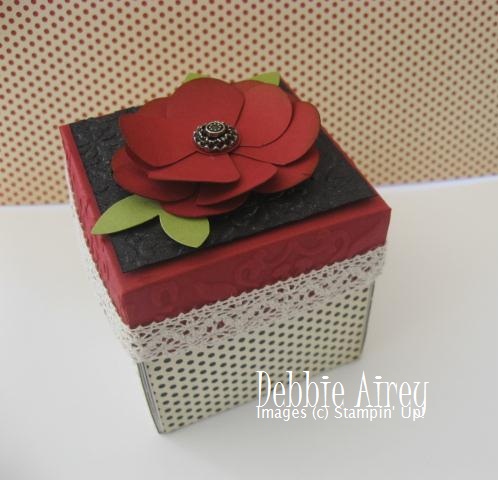
Encouragment Box

As I was working on the Conversation Boxes I thought about other ways I could use the boxes. We always need encouragement even on our best days. So I put some cards together with some encouraging scriptures from the Bible. I used the Love Letter DSP and trimmed the lid with the beautiful Victoria Crochet Trim.
The black card was put through the Bigshot using the Vintage Wallpaper Embossing folder and then sprayed with the Silver Foil smooch spritz.
I used the Fancy Flower punch to create the gorgeous flower on the lid.


Supplies Used:
Stamp Sets: Artistic Etchings
Card/Paper: Riding Hood Red, Old Olive, Basic Black, Very Vanilla, Love Letter DSP
Ink: Crumb Cake
Accessories: Fancy Flower pun
ch, 5-Petal Flower punch, Antique Brad, Victoria Crochet trim, Silver Foil smooch spritz, Vintage Wallpaper embossing folder

Thanks for stopping by!
Debbie

Thursday, March 3, 2011

Chatter Boxes!

Did that get your attention? This is a box that I have made for swapping for the Auckland Stampin' Up' Regionals. I also demonstarted this for a WOW presentation at the regionals.
Inside the box has cards which you can use for conversation starters. The box is small enough to carry aound in your hand bag or have in the car. Great for appointment waiting times and the meal table.


I have put together a tutorial, so you can make one yourself!

Step 1: For the base, I used the cardboard which is in the DSP packets. It is sturdy and has a lovely smooth finish. It is cut at 5 1/4" square and scored 1.5" on all sides.
For the lid I have used Tempting Turquoise card cut at 3 7/8" square and scored 3/4" on all sides.


Step 2: Cut on the score lines, up till where the other score line crosses over it, as shown. Fold all score lines.
Add sticky strip on the corners:


Step 3: Stick the base and lid together:


To decorate, I stamped the large flower from Punched Posies which is the Level 2 Hostess gift from the Summer Mini. I used Rose Red for this. I punched the flower out with the XL Fancy Flower punch. I stamped another flower with Pumpkin Pie ink and punched out the middle with a 1" circle punch. You can also add designer paper to the base of the box.

To make the button, I stamped an image from the Itty Bitty Bits onto Whisper White cardstock. I then punched out the image using one of the coordinating punches out of the Punch Pack. I dotted a tiny bit of Tombo glue around the image and placed the Bitty Button on top. So cute.

Now your ready to create your cards. The Rose Red piece is 2" square and the Whisper White piece is 1 7/8" square. The outline is from the Great Friends stamp set.

I have used the Rose Red marker to write my conversation starters.

Happy Chatting!

Debbie
Sunday, February 27, 2011

Thoughts and Prayers for Christchurch

I had made these cards a few weeks ago and had not put them on my blog. If there was ever a time to send encouragement to people this is the time!
Christchurch is my city. I live in Auckland now but my mum amd dad still live there.
I am incredibly thankful that my mum was in Wellington visiting a friend. She was due to fly back to Christchurch on Wednesday. Her stay has been extended till this Wednesday. We will both meet in Christchurch and spend some time at her house and come back to Auckland.
Our family send you people of Christchurch a big hug and we are praying for you.


{This card was inspired by Jenny Moors}

Debbie

Wednesday, February 23, 2011

Liebster Blog Award

Hi there, I feel very blessed and honoured to receive this blog award from Tammy!:
which translates, from German, into "Dearest Blog". The premise behind this award is to draw attention to new blogs, or blogs with fewer than 3,000 followers.

Thank you so very much Tammy for blessing me with this lovely blog award. Pop over to her blog: Stamp With Tam. It is very inspiring!

Now it is my turn to pass on this award to a few other people whose blogs inspire me. This is very tricky, as there are so many creative people out there!

Julia Leece

Helen Williams


Sharlene Meyer

Bron Heslop

Please vist each of these lovely blogs; these women are so creative and always inspire me.

Debbie

Saturday, February 19, 2011

Tea for Three

I bought a Papercraft magazine this month and saw a beautiful card which inspired me to make this one. I just LOVE the Victoria Crochet Trim from the Summer Mini Catalogue and teamed it up with the Elegant Soiree DSP. Of course the Teeny Tiny Sentiments is perfect to finish the card.
This would be a perfect card for an invitation to High Tea.


Supplies Used:
Stamp Sets: Share a Cup, Teeny Tiny Sentiments

Card/Paper: Soft Suede, Crumb Cake, Very Vanilla, Elegant Soiree DSP
Ink: Not Quite Navy, Soft Suede, Crumb Cake
Accessories: Scallop Edge punch, Wide Oval punch, Victoria Crochet Trim, pearls, mat pack, sponge

Debbie


Saturday, February 12, 2011

Owl House and Matching Card

Hi there! Yes, I know, it's been a bit quiet around here lately!!
We all know its Valentines Day tomorrow, and the challenge over at Just Add Ink is "Just Add Love" so I thought I'd play along.
I made this bird house (or owl house) which would be perfect with some choccies inside for that special someone. And also a matching card.


I have used the Punch Bunch stamp set which is a Sale-A-Bration (SAB) set. You can receive this GORGEOUS stamp set for free!! More info here.
I have also used the I {Heart} Hearts stamp set, the Medallion stamp as well as the Teeny Tiny Sentiments stamp set.

Supplies Used:
Stamp Sets: Punch Bunch, I {Heart} Hearts, Medallion, Teeny Tiny Sentiments
Card/Paper: Old Olive, Real Red, Crumb Cake, Very Vanilla, Whisper White, Bold Brights paper stack
Ink: Old Olive, Real Red, Maelon Mambo, Early Expersso
Acessories: Scallop Edge punch, 1 3/8" Circle punch, XL Owl punch, XL Bird punch, Full Heart punch, Word Window punch, Square Lattice embossing folder, Early Expresso 1/8" taffetta ribbon, clip assortement,


Check out the other FABULOUS entry's over at Just Add Ink, and have a go yourself!

Debbie

Tuesday, February 1, 2011

Twisted Easel Card Tutorial

Hi there, as promised, I have made the tutorial for the twisted easel card that I posted HERE. I got my instructions from Monica Gale, who is a very talented stamper. Visit her GORGEOUS blog HERE. I have tweaked some of the measurements. Here it is!

Step 1: Cut cardstock at 26 x 13 cm and score in half:


Step 2: Score the left half diagonally:


This is what it will look like: (the middle score line cannot be seen in the photo)


Step 3: Fold both score lines:


Step 4: Decorate! The card will require a raised embellishment to hold the top half in place.

Hope you have a go, and thanks for stopping by!

Debbie